
Choosing the Right Intranet Software Solution for Your Business
The right intranet can make the difference if you thrive your simply survive. We’ll show
How often have you wasted precious minutes—or even hours—searching for a document you just know exists somewhere? Or worse, discovered halfway through a project that the team has been working from the wrong version all along? These moments aren’t just frustrating; they can bring productivity to a screeching halt.
In this guide, we’ll explore why Confluence is the go-to solution for documentation and how you can make your pages more clear, engaging, and interactive.
Your team’s success starts here.
The Oxford Dictionary defines documentation as: “Material that provides official information or evidence, or that serves as a record.”
It sounds simple, but documentation is so much more. It’s the foundation of any successful team, capturing valuable knowledge, processes, and insights in one place. Without it, key details slip through the cracks, and teams waste time hunting for answers or duplicating efforts.
Good documentation ensures everyone has access to the information they need, exactly when they need it. Whether it’s a detailed guide or a quick reference, it keeps teams aligned, workflows efficient, and knowledge accessible—making it a cornerstone of productive collaboration.
46% of employees report that they “sometimes or almost always” struggle to find the information they need to do their jobs. That’s nearly half of the workforce wasting valuable time and energy hunting for answers that should be readily available.
So here are the benefits of documentation:
Saves Time: Knowledge workers spend an average of 2.5 hours per day searching for information, amounting to almost 30% of their workweek. Well-organized documentation eliminates this.
Boosts Collaboration: A centralized knowledge base keeps teams aligned, reducing miscommunication and enabling smoother workflows.
Preserves Knowledge: When employees leave, their expertise is captured and remains accessible, preventing a loss of critical information.
Increases Productivity: Employees can focus on their tasks without wasting time searching for or recreating information that already exists.
Reduces Costs: Inefficient information management costs businesses around $19,732 per employee annually, but effective documentation helps cut unnecessary expenses.
Confluence is built for collaboration. As a web-based platform, it makes teamwork seamless—whether your colleagues are across the office or across the globe. With Confluence, you can centralize all your documentation, keep it updated in real time, and notify your team automatically when changes are made.
Its simplicity is perfect for creating documentation that’s accessible to everyone, regardless of experience level. Plus, with features like templates, version history, and powerful integrations with tools like Jira, Confluence makes managing and sharing knowledge effortless.
For teams already using Atlassian tools, Confluence is the obvious choice for streamlined documentation.
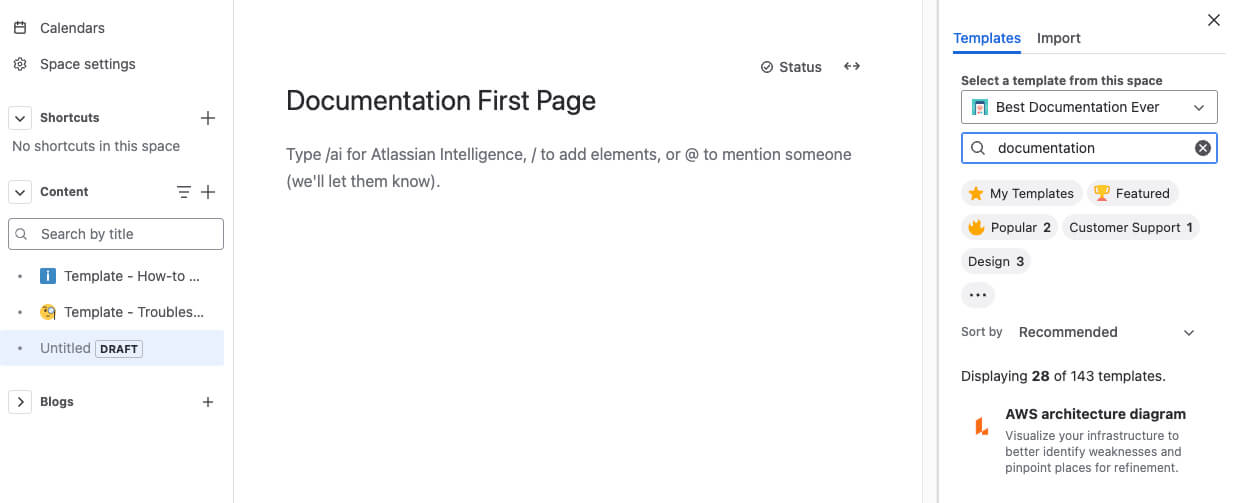
Using Confluence for documentation is simple, intuitive, and designed to make your life easier. Whether you’re creating a knowledge base, project updates, or step-by-step guides, Confluence’s flexible features adapt to your team’s needs. Here’s how to get started:
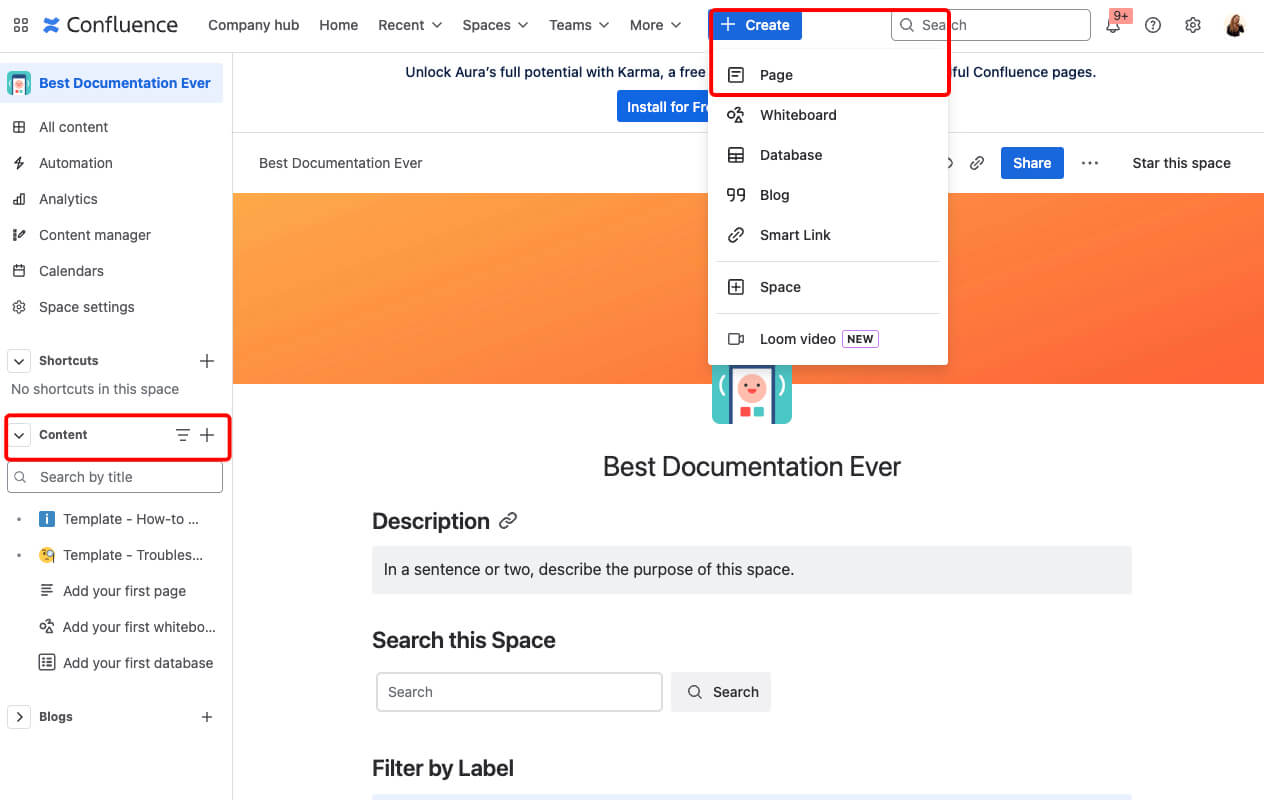
Every great documentation setup starts with a dedicated space.
Go to Spaces > Create Space, then you can choose between Collaboration, Knowledge Base and Custom. The knowledge base space is perfect for documentation. It’s designed to store, organize, and share information, making it perfect for building a knowledge hub or documentation area. It comes with helpful tools like search optimization and templates for how-to articles or troubleshooting guides.
Give it a clear, recognizable name, so everyone knows where to find it.
Now, it’s time to create your pages. Confluence pages are like your blank canvas—a place where you can design guides, share updates, and capture knowledge in a way that’s both useful and beautiful.
Click the Create button at the top of your screen to start a new page.
If you want to create a subpage (child page), navigate to an existing page, click the + icon, and your new page will nest right below it.
Then, you should name your page and make your life easier by using a Confluence page template. From How-To Articles to Software Documentation, templates give you a head start and ensure consistency.
Browse templates and search by keywords like “guide” or “documentation.”
Once you pick one, it’s as easy as filling in the blanks.
You can’t find a template that matches your needs? No worries—you can easily create your own Confluence template!
Not every piece of documentation is meant for everyone. Whether you’re protecting sensitive information or ensuring only the right people can make changes, page restrictions in Confluence are a game changer.
Open the page you want to restrict.
Click the Lock Icon at the top-right corner of the page, next to the Share button.
From the dropdown, choose one of these options:
Anyone in this space can edit: Grants full edit permissions to all users who have access to the space.
Anyone in this space can view: Allows all users in the space to view the page, but only specific people can edit.
Only specific people van view or edit: Restricts both editing and viewing to selected individuals or groups.
Add users or groups to the page permissions list by typing their name into the search bar, then select their role (view or edit).
Tips for Managing Page Restrictions
Be Clear About Access: Use clear naming conventions or tags to help your team understand which pages are restricted and why.
Test Permissions: Switch to View as Another User in Space Settings to ensure restrictions are applied correctly.
Document Your Policies: Create a page outlining who can access specific spaces and pages for transparency.
A well-structured Confluence page makes your documentation intuitive and easy to navigate. Here are some best practices:
Break Down Long Pages with Headings
No one likes walls of text. Use headings (H1, H2, H3) to divide content into sections, so readers can scan and jump directly to the information they need.
For a deep dive into all the ways you can highlight content, check out our article: The 5 Best Ways to Highlight Text in Confluence.
Highlight Progress with the Status Macro
Need a quick way to show the progress of a task or Confluence project? The Status Macro in Confluence lets you add color-coded labels like “In Progress,” “Completed,” or “Blocked” directly to your pages.
It’s perfect for calling attention to key updates and ensuring your team stays on the same page at a glance. Whether it’s tracking project milestones or flagging important details, the Status Macro is a simple yet powerful tool to keep your documentation clear and actionable.
If you’re looking for an interactive Status Macro, the Aura Macro Suite from appanvil can help. With it, you can create statuses in various shapes and colors and even update them in view mode—perfect for engaging meetings.
The Best Documentation Structure with Tabs in Confluence
The Aura Content Formatting Macros include a Tab Macro that takes your documentation to the next level. You can create both horizontal and vertical tabs to organize your content effectively. This is perfect for keeping long pages manageable and ensuring your readers can focus on the details most relevant to them.
And what about child pages?
Aura macro lets you display content from child pages directly on the parent page in a sleek, tabbed layout. Unlike Confluence’s built-in macros, Aura makes it possible to consume the content of child pages without navigating away from the parent page. This not only saves time but also enhances the user experience by reducing clicks and maintaining context.
What’s more, Aura’s macros are designed with aesthetics in mind. The tabs are highly customizable, allowing you to match their appearance to your team’s branding or preferred style. Whether you’re organizing FAQs, step-by-step guides, or product documentation, Aura ensures your content looks polished, professional, and easy to navigate.
Labels in Confluence are tags you can attach to pages to categorize and organize your content. They’re a simple but powerful tool, especially in documentation spaces, where they help users quickly locate relevant information based on keywords or topics.
Adding labels ensures your team doesn’t waste time digging for content—it’s all grouped logically and made easy to find through Confluence’s search.
Open the page or article you’d like to label, and click the pencil icon to enter edit mode.
Go to the “More options” menu (represented by the … icon) in the top-right corner of the page.
Select “Add labels” (or “Edit labels” if labels already exist).
Once added, labels become part of the page metadata, improving its discoverability in searches.
Even the most comprehensive documentation loses its value if it’s not regularly updated. Keeping your content fresh and relevant is critical for ensuring your team always has access to accurate, actionable information. The best way to stay ahead? Automate it with the Dynamic Content Macro from Aura.
The Aura Dynamic Content Macro supports a wide variety of content types, including:
Happy customers say:
Your team deserves better than scattered files and outdated information. With Confluence, you can create a documentation that inspires confidence, ensures employee engagement, and keeps everyone moving in the same direction.
With the right tools—like Confluence’s built-in features and powerful enhancements from Aura—you’re setting your team up for success.
Start building your documentation in Confluence today and see the difference it makes for your team.
Supercharge your Confluence
The right intranet can make the difference if you thrive your simply survive. We’ll show
It takes second sto invade a companie’s system and days or even monthts to ecover
Documentation Management is not easy. With Confluence, it can be. We’ll show you how.
You are currently viewing a placeholder content from Wistia. To access the actual content, click the button below. Please note that doing so will share data with third-party providers.
More Information